Training
The Single Player Terran campaigns can give you a chance to learn how to use the basic abilities
of Terrans. They start out easy, then increase in difficulty while introducing more units and abilities.
After mastering those, players wanting to improve their use of Terrans can try the Veteran campaigns.
Go to Single Player -> Play Custom -> then select the Campaign folder (first one on the list).
Make sure you serve the game type as Use Map Settings.
You can choose to start at the beginning and play the whole campaign in order, or head straight to
(1)Enslavers3a.scm. This map starts you as Terrans against Protoss and Terrans. This map is very
good training for Terran players. While newer Terran players, and even experienced players will find it
very difficult, if you continue playing it over and over, you will eventually be able to beat it. As you play it,
you learn new and better ways to fight both the Protoss and Terrans. After you are able to beat this
mission, try (1)Enslavers3b.scm which puts you as Terran/Protoss against Zerg and Terran. This one
is very difficult but it can be beaten.
Construction
A SCV must work on constructing new buildings until the building is finished. During the construction
period, the SCV is still vulnerable to attack. If the SCV stops working or is destroyed, the partially
completed building will remain until it is destroyed, cancelled, or another SCV starts to work on it
again. Only one SCV can build a structure at one time, but multiple SCVs can be used to repair a
damaged building.
Support
Terrans require Supply Depots to provide support for their troops. Each Supply Depot provides 8 Supply,
and each Command Center provides 10 Supply. It's vital to keep a close eye on your available Supplies
to make sure you always have enough to build new troops, especially at the beginning of the game.
A halt in the combat unit production caused by not having enough supply available can make a huge difference.
Critical Damage
The hodge-podge circuitry and components used in Terran buildings make them easy to repair but
they can burn up if left alone after being severely damaged in an attack.
Once a Terran building has been damaged into the "red zone" (reduced to about 1/3 Hit Points, red wire frame)
it will slowly lose hit points until it reaches 0 and is destroyed.
You must repair it until it is in the "yellow zone" or greater to stop the decaying process of
the building. Note that this only applies to Terran buildings, not units.
Upgrades
You can only research one upgrade at a time at any building, and the wide variety of Terran upgrades
means that it can take a while to research everything. It's usually a good idea to build at least
two Armories (they are very cheap) and you might want to build three to upgrade faster. Multiple
Engineering Bays are less useful but could be helpful if you plan on using a lot of Marines.
Lifting Off (or, "That's it, I'm outta here!")
If you look at most the Terran Buildings you will notice that many have the
available. These
buildings are capable of limited flight, and while slow and vulnerable in the air their mobility can
be used both for rapid expansion and to flee from enemy ground troops. The Command Center, Barracks,
Engineering Bay, Factory, Starport, and Science Facility are all capable of flight.
Buildings may only land on open, buildable land. You cannot land buildings just anywhere. You cannot land it
on top of units either, so you cannot crush enemy units with buildings. Buildings have
no attack of their own when flying so they are vulnerable to attack, and against most air units they
will take even more damage from air-to-air attacks.
Some interesting uses for Lift-Off:
- When a resource spot is mined out, rather than just letting your Command Center sit around,
you can fly it to another resource spot.
- When your buildings are being attacked by melee/ground units only, such as Zealots, Zergling,
Ultralisks, Reavers, Tanks, etc. lift-off your buildings. The melee units will not be able to
attack them. This can save the buildings until reinforcements arrive, or force the enemy to
engage other buildings like Bunkers. This is especially useful with Command Centers as they are very expensive.
- In island maps, you can build a Command Center and fly it over to an island without a
transport. You can also fly Barracks over early in the game and build a few Marines on different islands
to secure them before the enemy is able to transport troops to them.
- You can construct a building on lower ground, then fly it up to the safety of high ground
to either build units or to keep the buildings safe. Some maps have secondary resource nodes on
high ground that aren't accessible from the ground.
- If you have a building capable of two add-ons such as the Science Facility and Command Center,
and decide you want the other add-on, instead of destroying the old add-on and building the
new one, you can lift off and build the other add-on and switch between the two as necessary.
- If you find that a Terran enemy has abandoned some valuable add-ons, you can fly your buildings to that
location, land by them, and use them. This is of course a rare application.
- If you are being nuked, you can lift-off buildings in the targeted area and run before the nuke hits if you
are fast enough. You probably won't escape the blast, but you can get away from ground zero and reduce the damage that you take.
- You can run away and set up at another location if your town is about to
fall. You can return when it's safe, or run away to some other location to rebuild your town.
Flee toward allies in allied games.
- You can lift-off a building and fly it a bit out of your town to spot for your Siege Tanks,
increasing their effective range. If your building comes under attack you can always fly
it back into town, repair it, and send it back again.
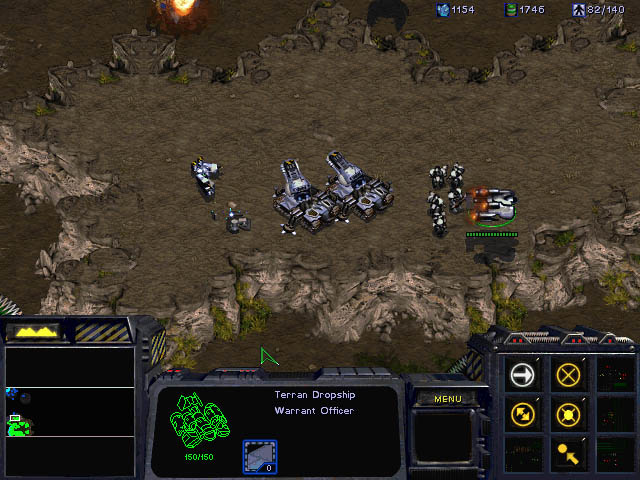
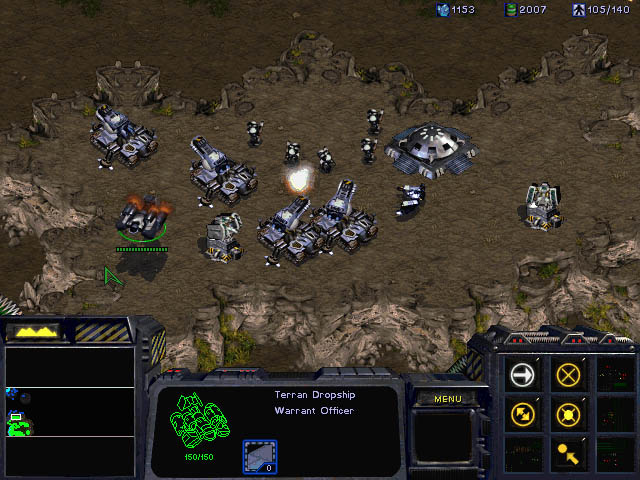
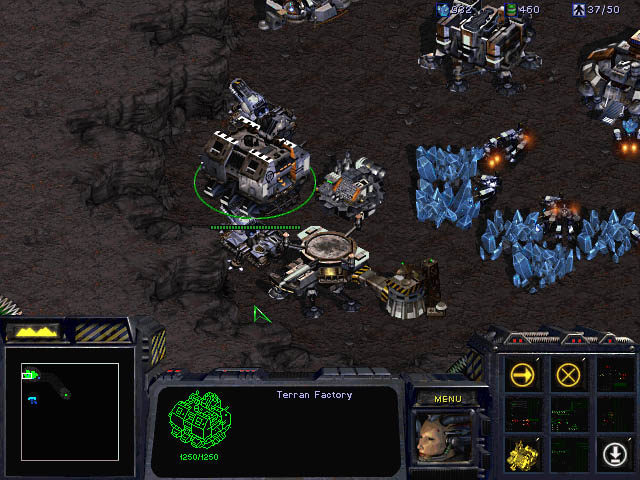
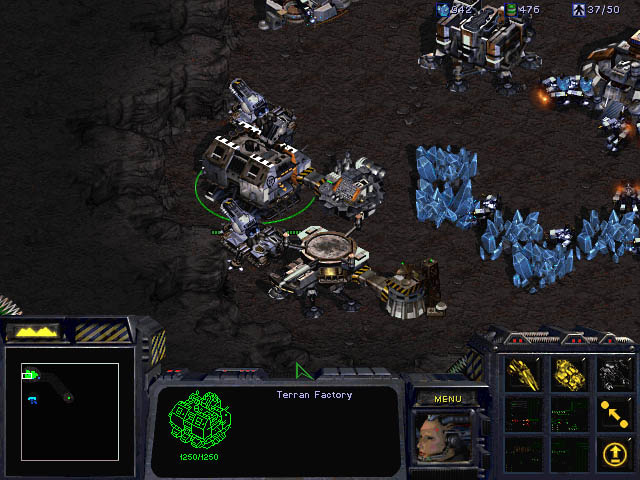
 In the first picture you cannot see the ground above your Siege Tanks.
By lifting off the Factory, the upper ground can be viewed and fired upon by the Siege Tanks.
You can even use buildings to scout the map if you have enough time on your hands,
or send them over the enemy's town to confuse or annoy them.
In the first picture you cannot see the ground above your Siege Tanks.
By lifting off the Factory, the upper ground can be viewed and fired upon by the Siege Tanks.
You can even use buildings to scout the map if you have enough time on your hands,
or send them over the enemy's town to confuse or annoy them.
Remember that you can repair buildings in the air. Placing more SCVs on repairing will repair
the buildings faster. If they are being attacked by air only units, you can repair them
in the air until they land or get to their destination. This situation comes up occasionally.
Add-ons
There are six add-on buildings for the Terrans:
- The Command Center has two add-ons: the ComSat Station for performing sensor sweeps,
and the Nuclear Silo for manufacturing nukes.
- The Factory has the Machine Shop which allows you to research special abilities for the Vulture and Tank. This add-on is necessary to build Siege Tanks.
- The Starport can build a Control Tower add-on which allows it to build Dropships, Battlecruisers,
and Science Vessels (with a Science Facility) as well as research technology upgrades for the Wraith.
- The Science Facility has two add-ons: the Covert Ops lab for training and upgrading Ghosts,
and the Physics Lab which allows you to build Battlecruisers and research the Yamato Cannon.
Add-ons must be used with the building they are designed are for them to work. You can
land a Factory next to a Control Tower but it won't connect or function properly.
When constructing buildings capable of having add-ons be sure you keep the right side
of the building open when you place it. While it's easy to lift-off the building and move it to a place where the
add-on can be built, it's much faster to just build well the first time and leave the
spot open so you don't have to move the building.
An add-on belongs to you as long as your building remains connected to it. If you lift-off your
building, the add-on building becomes neutral. Any other Terran ally (or enemy) can land
a building next to it and attach to it. It is possible to capture or use abandoned add-ons,
although this isn't something that happens too often.
If the main building is destroyed, but the add-on remains, reuse the add-on by rebuilding
in the same spot. For example if your Factory was destroyed but your Machine Shop was not, select
a SCV and instruct it to build a Factory. A special placement box will come up indicating to you
where you should build the Factory if you want it to attach to the Machine shop.
Sometimes you might want to use one building and switch between add-on buildings. This can be handy
if you're trying to save some money and, for instance, want to alternate between building Ghosts
and Battlecruisers. You can move your Science Facility between a Covert Ops lab and a Physics Lab.
You can do the same thing with Command Centers if you want
to launch a few Nukes, then go back to your ComSat Station.
Building Your Town
With Terrans, it's very important to build a nice tight defense to prevent both attacks on your workers
and your buildings. With careful planning, you can build your town such that a few Bunkers can cover
the entire area, especially with the U-238 upgrade for your Marines.
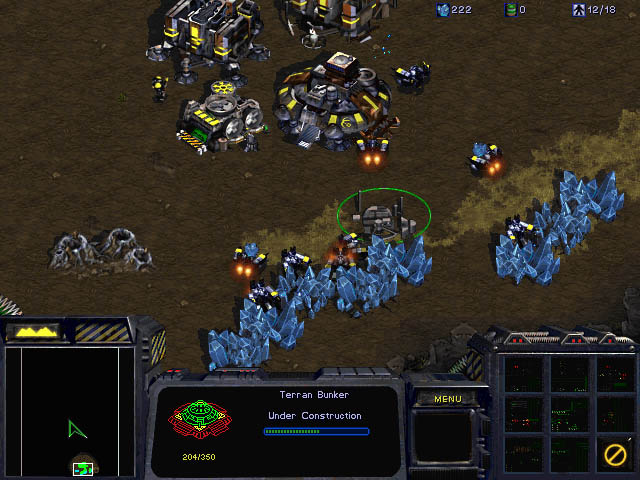
If you plan on building Bunkers, build your first Bunker in the middle of the SCVs mining resources.
SCVs will be traveling between the Minerals and your Command Center while you're trying to place
the Bunker, so it might be easier to stop your workers for a moment while you start on the Bunker.
The reason to build it here is this is where the enemy usually tries to attack.
If you build your Bunkers elsewhere, the enemy
may cruise right past them and attack your SCVs, crippling your economy. If they target your buildings
instead of going for the Bunker,
you can lift them up and fly them over by the Bunker. If they attack the Bunker directly, you can easily select
all the SCVs and instruct them to repair the Bunker as it is being attacked.
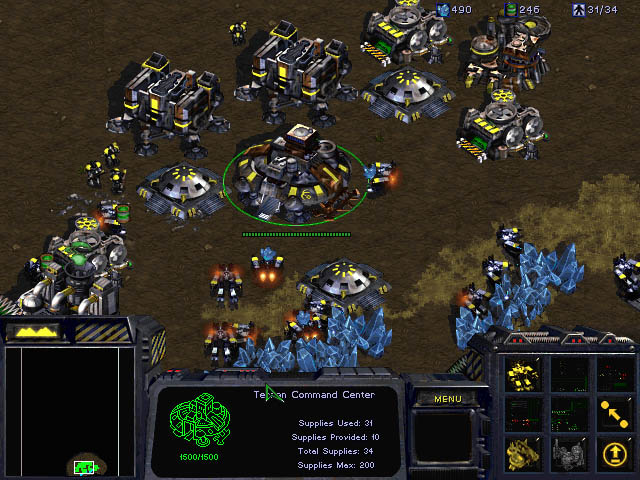
As the game progresses, add more Bunkers around your town. They should be placed close enough to each
other that they set up a nice crossfire. Buildings should be placed around the Bunkers to make them more difficult
to reach, especially by melee units like Zealots and Zergling.

The first formation shown above allows the SCVs to mine easily while making it more difficult for the enemy
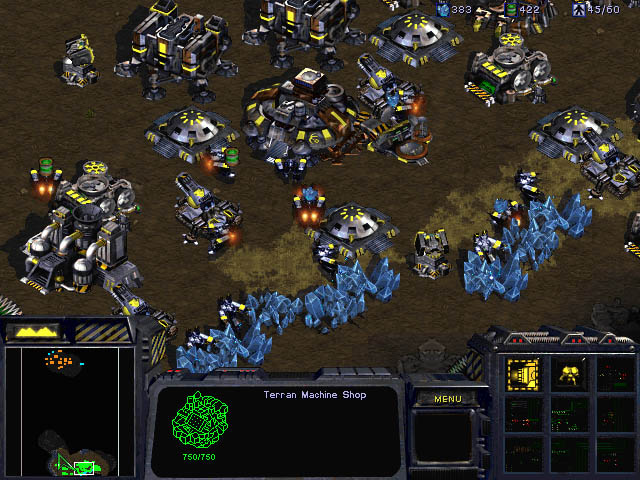
to attack your resources. You can further add to this type of defense by building Missile Turrets evenly
around it, and placing Siege Tanks in Siege Mode around the base. Be careful to leave room for the ComSat
Station and any other add-ons when you are building. A common mistake is to place a building to the right of
your Command Center, which forces you to destroy it or move the Command Center later.
The next two images show the town as its defenses are bolstered by Tanks and Missile Turrets. Although the
Bunkers (and possibly a few Goliaths) are the town's primary air defense, the Missile Turrets are used for
extra firepower and detection. With good tower coverage, it will be very difficult for anyone to sneak
cloaked units into the base.
Securing High Ground
Terrans can easily and quickly secure high ground from all sorts of attacks.
It's important to not only use Siege Tanks, but Marines/Goliaths as well as Missile Turrets
for cloak detection and support fire.
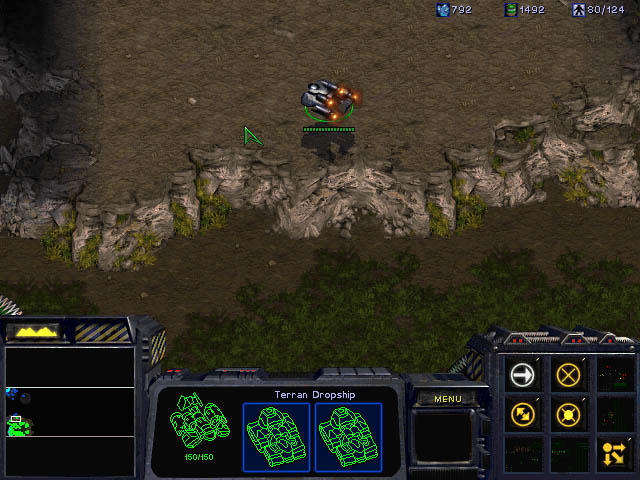
Above in the first picture, a Dropship carries two Siege Tanks with Siege Mode to higher ground.
The Siege Tanks unload then move into Siege Mode. In the second picture, the Dropship's second
load carries some Marines with Stim Pack and a SCV. The SCV begins constructing a Missile
Turret. In the third picture, the high ground has been further enforced. This force should fight
off any transport invasion. Ghosts and Goliaths should be added for defense
against large air attacks. More SCVs should be brought up to more quickly repair damaged
units. If the attacker are using Mutalisks, more Bunkers and Marines should
be added.
Counters:
Terran
-
Terran players can Yamato these defenses from a distance using Battlecruisers.
-
Cloaked Ghosts might be able to sneak some Lockdown casts onto the units up high.
- Siege Tanks with Defensive Matrix can be brought in.
The Defensive Matrix should give them time to move into Siege Mode. Another Defensive Matrix can be
cast on the Siege Tanks if it starts to wear off. A Scanner Sweep can spot for the Siege Tanks so
they can fire on the units up on high ground.
- Dropships with Defensive Matrix on them might have time to land Marines on the high ground.
Protoss
- The Templars might be able to sneak a Psionic Storm on the units above if they are tied up in combat.
- A Large group of Carriers or Scouts can break through this defense if the Carriers are not locked down.
- Use an Arbiter to cast Stasis Fields on units on the High Ground. Then follow up with a Shuttle
landing of Archons or Zealots.
Zerg
- Use Guardians to attack these formations from a distances. The Terrans will be forced to come out
or die.
- Use Queens to Broodling Siege Tanks, Marines, Goliaths, and Vultures.
- Use Queens to cast ensnare on the units up there to make them fire slower. This won't touch Marines
in Bunkers however (a good spell defense).
- Cast Plague on units up there, that should soften the units up enough to attack. A group of
SCVs can quickly reverse this spell however if the attack is not immediate.
 In the first picture you cannot see the ground above your Siege Tanks.
By lifting off the Factory, the upper ground can be viewed and fired upon by the Siege Tanks.
You can even use buildings to scout the map if you have enough time on your hands,
or send them over the enemy's town to confuse or annoy them.
In the first picture you cannot see the ground above your Siege Tanks.
By lifting off the Factory, the upper ground can be viewed and fired upon by the Siege Tanks.
You can even use buildings to scout the map if you have enough time on your hands,
or send them over the enemy's town to confuse or annoy them.