|
 |
 |
 |
Hit Points: 200
Plasma Shields: 150
Size: Large
Supply: 4
Cost: 100  350 350 
Build Time: 160
Produced at: Stargate
Requires: Arbiter Tribunal
|
Energy: 200 (Upgrade to 250)
Base Ground Attack: 10e
Base Air Attack: 10e
Base Armor: 1
Range: 5
Sight: 9
Cooldown: 45
Production Hot Key: A
|
|
The only warship to be crewed exclusively by non-Templar, the mighty Arbiter is used to provide special support for assault groups.
Psychic Judicators crew the Arbiter ships, and they use the Arbiter as a focal point to project a reality-warping field that serves
to conceal all friendly units within close proximity. Since the Arbiter must be anchored firmly in space-time to safely generate such
a large field, it is immune to the effects and remains visible, even when surrounded by the field of another Arbiter.
The Judicator crew can also use the Arbiter to quickly move troops from one location to another, by opening up a rift in the fabric
of space-time. Troops entering the warp rift are Recalled back to the Arbiter that formed the field. These teleported troops, of
course, also benefit from the Arbiter's distortion field.
In addition to destabilizing local reality to generate its distortion field, some Arbiters are capable of strengthening discrete
pockets of space-time. Anything caught within these absolute pockets is beyond the reach of any normal interaction, friendly or
otherwise. Units trapped in a stasis field can neither move nor attack, and are completely immune to the effects of damage and
special abilities. This ability is equally effective at protecting Protoss troops until reinforcements can arrive, and pacifying
foolish attackers.
The Arbiter can inflict 10 point of damage to air and ground targets, however,
the expense and abilities of the Arbiter make it a unit best used for other purposes. If there is no means of immediate escape and the Arbiter
has used all of its energy, then its attack should be used as a final resort for defense. Also as a result of the Arbiter's weak attack, you
should always keep them escorted by support units (Scouts, Dragoons, Carriers, etc.).
One thing to be wary of is an idle Arbiter. The Arbiter has an attack range of 5 and, unfortunately for the Arbiter, a lot of units have a
greater attack range and can begin firing on the Arbiter before it can, leading to quick destruction. A clever opponent can use this against
you by luring idle Arbiters into traps/ambushes by purposely moving a unit into the Arbiter attack range or firing a single shot at the Arbiter and
retreating to the trap. The best prevention for this type of scenario is to Hold Position by selecting the
Arbiter and using the hotkeyH. However, if you receive the attack alert, be ready to issue a command for
the Arbiter as soon as possible,otherwise the Arbiter will remain rooted in position while being attacked (and again, many units have a greater
attack range than the Arbiter and in a Hold Position case, the Arbiter will stand still while the enemy gets free hits).
The two main reasons to build Arbiters are for the ability to cloak groups of nearby units at any time, and for the
special abilities, Recall and Stasis Field. But as with all units in StarCraft, power comes at a price, and with the
Arbiter, there is a hefty Vespine gas requirement for its production. To maintain the advantage an Arbiter can give you
as well as to protect the investment you have put into Arbiter production, you should always keep an eye on your Arbiter's
condition (PS/HP). They don't have a lot of Plasma Shield Points or Hit Points so try to avoid aggressive use of the Arbiter,
particularly in the heat of battle. The best way to extend the Arbiter's usability is to keep its Plasma Shields at full
with Shield Batteries and know when to retreat to the Shield Batteries.
Another way to increase the life span of your Arbiters is to make generous use of Hallucination with High Templars. By creating
decoy Arbiters, you can easily confuse your enemy as they try and discern which Arbiter is actually creating the cloak field.
The hesitation it causes can give your units time to wreck havoc within the cloak field and increase the overall effectiveness
of your force. However, don't waste this advantage by leaving your real Arbiters in front of the decoys during an attack, since
all units (unless commanded to do otherwise) auto-acquire the nearest enemy unit for attack, and if they cannot detect the units
beneath the cloak field, they will target the Arbiters first.
The Arbiter's cloak field is extremely useful in both offensive and defensive situations, especially since it is always "on". On offense, if
you can avoid or destroy enemy detectors with support units, the force beneath the Arbiter can cause massive damage on an opponent. To ensure
you can clear out enemy detection, be sure to "link" an Observer or two with your Arbiter at all times. To "link", select an Observer and
right-click on the Arbiter to have it follow the Arbiter without further management on your part. The faster you destroy the enemy detectors,
the more time you'll have for uncontested attack, so always target the detectors first in an encounter.
On defense, use Arbiters to cloak your Probes, to prevent your opponent from attack them as they mine the resources. Also with the Arbiter
in close proximity to Shield Batteries you may have, you can keep your Arbiters at full strength much more easily, which in turn helps maintain
a cloak field over your defending/working force for a longer time.
While Arbiters can cloak any of your units (except other Arbiters), no matter what species, they cannot cloak your allies in Allied Games.
However, in Team Games, they will cloak your teammate's units, no matter what species they chose. The only times the Arbiter's cloak field will
not work for you is when the Arbiter is either Locked Down (by Terran Ghosts) or caught in a Stasis Field from another Arbiter. The cloak field is
neutralized until the effect wears off. Also if one of your Arbiters happens to get infected with Parasite by a Zerg Queen, they will only see
the Arbiter's position and the area within its sight range, it will NOT reveal the units within the Arbiter's cloak field.
|
|
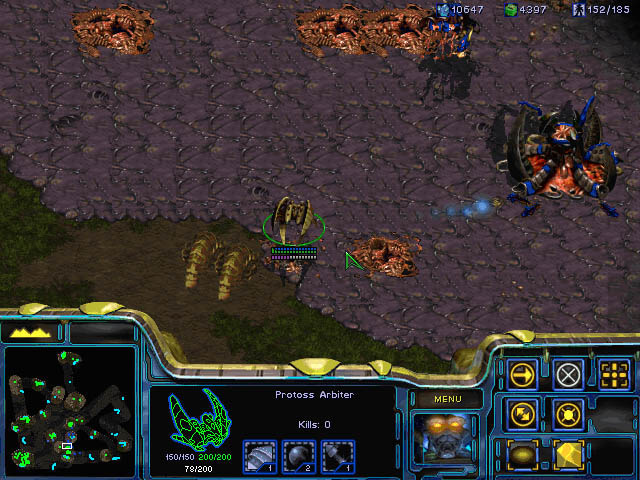
[ Click to Enlarge - 98 KB ]
An Arbiter cloaks two Reavers attacking a Zerg town. These Reavers cannot be targeted unless they are detected.
|
Terrans
- Use Cloaked Wraiths to destroy Arbiters that are lacking detection or support
- Valkyries work well against packs of Arbiters, even if they are Hallucinated decoys
- Use Yamato Guns with Battlecruisers to aid in taking out Arbiters
- If Arbiters look like they're being used a lot, be sure to build up an abundance of Missile Turrets in your base(s) to help detect cloaked
units as well as fight off the Arbiters
- Use EMP Shockwave with Science Vessels to deplete Arbiter shields as well as the shields of units in the cloak field (will also instantly
destroy decoy Arbiter Hallucinations)
- Use Lockdown with Ghosts to immobilize Arbiters as well as neutralize their cloak field
Protoss
- Use Psionic Storm with High Templar to severely damage Arbiters as well as any units beneath it in the cloak field
- Use Stasis Field with your own Arbiters to immobilize enemy Arbiters as well as neutralize their cloak field
- Increase Observer production if you notice your opponent is making good use of their Arbiters
- Build Photon Cannons in your base(s) to help detect units in an invading Arbiter cloaked force as well as for attacking the
Arbiters themselves
- Use Mind Control with Dark Archons to capture Arbiters for your own use
- Use Feedback with Dark Archons to turn their energy against them
Zerg
- Use Scourge to destroy wandering Arbiters (need 4 Scourge Hits to destroy an Arbiter)
- Use Ensnare with Queens to slow the Arbiter as well as reveal and slow any units beneath it (detected or not)
- Use Plague with Defilers to heavily damage the Arbiter as well as reveal and damage the units beneath it (detected or not)
- Use groups of Devourers to quickly destroy Arbiters
- Keep Overlords nearby attack sites or with attack forces to detect forces that an incoming Arbiter may be cloaking
- Use Spore Colonies to detect units in an Arbiter's cloak field, as well as to ward off the Arbiter itself

|
Air Weapons
Level 1 -
100  100
100 
Level 2 -
175
175
Level 3 -
250
250
|

|
Air Armor
Level 1 -
150
150
Level 2 -
225
225
Level 3 -
300
300
|

|
Plasma Shields
Level 1 -
200
200
Level 2 -
300
300
Level 3 -
400
400
|

|
Khaydarin Core
150
150
+50 Energy Capacity
|
Air Weapons -
Ground attack is upgraded +1 per upgrade for a total of +3. Air attack is upgraded +2 per upgrade for a total of +6.
Air Armor -
Each Upgrade adds +1 to Armor for a total of +3 with all three upgrades.
Plasma Shields -
Each Upgrade adds +1 to Shields for a total of +3 with all three upgrades.
Khaydarin Core -
If you plan on using Arbiters for Stasis and Recall, this upgrade is a necessity. If you are just using them to cloak units, don't
bother.
The Recall ability opens a 5x5 matrix wormhole which teleports the units (both ground and air), in the area of effect to the
casting Arbiter. The ability only affects yours or your teammate's units (in Team Games) but not allied units (in Allied or Melee Games).
One interesting property of Recall is that it is not restricted to only Protoss units. If you have Mind Controlled units from your enemies, whether
they're Zerg or Terran, or if your teammate has chosen either Zerg or Terran as their race, your Arbiters can Recall those units as well.
Example: You can recall a group of your Zealots and High Templar, Mind Controlled Siege Tanks and your teammate's Guardians all in one
cast (if they can all fit within the 5x5 matrix area).
Note that units are Recalled in their current state, whether they are Plagued, Ensnared, Locked Down, Irradiated, Maelstromed, etc. Recall
does NOT remove special ability effects.
Unless you have an emergency (i.e. a group of heavily damaged Carriers that need to escape immediately) and don't have time to waste, the
most effective use of Recall lies in gathering as many units into a 5x5 matrix as possible. This means pack those Zealots, Dark Templar, Dragoons,
Reavers, etc. as close together as you can on the ground and then if you have available air units, stack them on top of the ground units within the
area of effect. If you want to transport the absolute maximum number of units in a single Recall, pack the larger ground units together on the
ground (i.e. Dragoons and Reavers), load the smaller ground units (Zealots, High Templar and Dark Templar) into Shuttles and stack the Shuttles
on top of the large ground units and squeeze Scouts or Carriers into whatever air space is left within the 5x5 area. Once the force is Recalled,
immediately unload the Shuttles (all at one time if you can) and your enemy will be easily overwhelmed by a balanced force of 30+ units in the blink
of an eye.
There are a few limitations with the Recall ability. One being that if the Arbiter is over impassable terrain (i.e. water, space, ice, etc.) when it
uses Recall, only the air units within the area of effect will be teleported, leaving the ground units at their location. So if you plan on teleporting
a large air/ground force, make sure your Arbiter is over passable terrain when it Recalls. Also if a unit is within a Stasis Field, the Arbiter is
unable to Recall it, until the effect wears off.
Recall can be extremely useful in both offensive and defensive situations, especially in island warfare. On offense, you can use your Arbiter
to sneak through any holes in your opponent's defenses and then recall a large force right into the middle of their base (hopefully bypassing
any blockades/fortifications your opponent may have built). This comes in handy especially if you need to halt your enemy's resource gathering
at his/her main base or expansion bases. Also depending on how well you set up your force for the Recall, you can surprise and damage or enemy in
the worst case scenario or completely crush them at best. In island warfare, this means of transport is also much faster than loading and unloading
numerous Shuttles for a force nowhere near the size that you could Recall and your units do not have to wait to unload one at time making the element
of surprise much more effective. Also when on offense, you can use Recall to teleport newly produced units to a battle in progress, relieving some
pressure from the units already in combat.
In defensive situations, Recall can instantly save damaged units so that you can charge their Plasma Shields with Shield Batteries or give them time to
recharge their internal energy. This is especially useful for large/powerful units that are difficult to produce like Carriers, Archons or Dark Archons.
The more Arbiters you have, the easier it is to move forces around the map in a very short amount of time. And in large maps like Killing Fields or
Frozen Sea, Recall can help you quickly shut down enemy expansions.
And almost as a bonus, units that you Recall are instantly within the Arbiter's cloak field, so as soon as they arrive, the enemy is unable to retaliate,
unless they have detectors nearby.
|
|
|
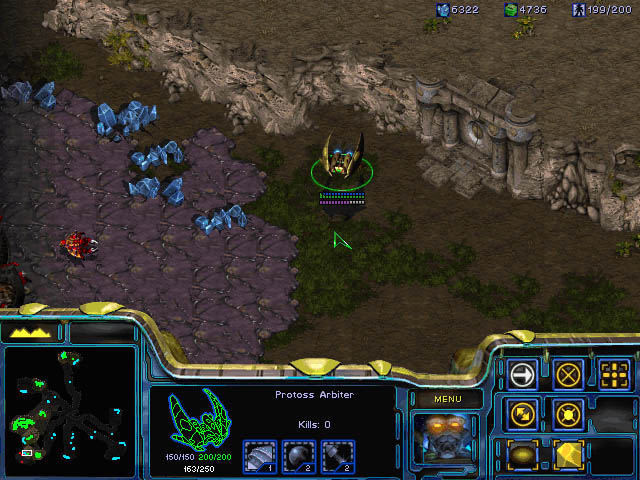
[ Click to Enlarge - 93 KB ]
Sometimes the only way to get in a heavily defended area (especially in island warfare)...
|
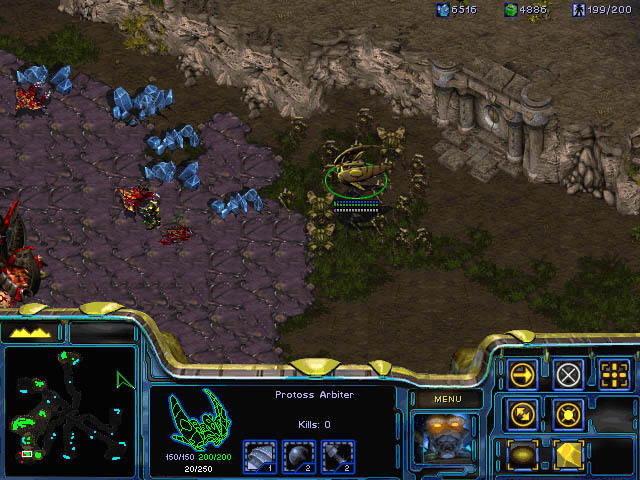
[ Click to Enlarge - 96 KB ]
...is to use an offensive Recall.
|

|
Stasis Field
150
150
Cost: 100 
Range: 9
|
When used, all units within a 3x3 matrix radius around the point of casting are trapped within a Stasis Field. While trapped, the units cannot be
damaged, move, attack, or use special abilities. It lasts for a duration of about 40 seconds.
Stasis Fields can be used for a wide variety of uses, both offensive and defensive, but it is a relatively long lasting effect so
be careful when selecting your targets.
For offensive purposes, you can use Stasis Field to take enemy units out of battle for a long, if temporary duration. If you are
outnumbered or being overwhelmed, Stasis Fields can help even the odds. If you're evenly matched, Stasis Field can turn the tables in
your favor. Just be sure to cast it on enemy units that have suffered the least amount of damage or have the most powerful attack so that
you can dispatch the weaker, more damaged support units as quickly as possible. If you've destroyed any support groups and are waiting for
the Stasis Field to wear off, use the time to position your units in the best possible position for attack once the enemy is released. For example:
If you've placed an enemy's Siege Tanks in a Stasis Field, quickly take out all the supporting units (whether they're Marines/Firebats, etc.) and
then position any melee units you may have right next to the Tanks and move your other units outside of the Tank attack range, so that when the
Tanks are released, you'll have them surrounded with no ranged attack units to hit. However, in your follow up attack, be sure to resort only to
physical attacks, since units within the Stasis Field are immune against any special ability attack (including Plague, Ensnare, Lockdown, Irradiate,
etc.) with one exception: EMP Shockwave. If units within the field are hit by an EMP Shockwave, they will still lose all Energy Points and/or
Plasma Shields they may have.
Other offensive tactics include casting a Stasis Field over enemy Protoss units if your opponent looks to be gathering them for a Recall. (Stasis
Field prevents a unit from being Recalled) You can also use Stasis Field as a pre-emptive measure against units you may have trouble defending
against, such as Hydralisks morphing into Lurkers, Mutalisks morphing int Guardians or High Templar merging into an Archon. While it doesn't stop
their gestation process, it does delay it for a while, hopefully long enough for you to bring Observers to a battle site, getting the proper anti-air
defense set up, etc. Also, setting a Stasis Field over enemy workers can also slow an enemy's resource production long enough to give you a mining
advantage.
Defensively speaking, Stasis Field can be the desperate move that may save your defending units from bad situations. Stasis Field can be used
to stop the effects of Plague (halts the loss of HP and outlasts the Plague effect so that when your units do emerge from the Stasis Field they
have retained their HP and no longer have the Plague), which for the Protoss is a definite advantage since they have no way of recovering HP once
they lose it. It can also save vital units from the effects of Psionic Storm, Spawn Broodling (if cast before the Spawn Broodling is used), Ensnare,
Lockdown, Irradiate, etc. In addition to protecting units from special abilities, Stasis Field protects from any physical attack as well, even the
mighty Terran Nuke. If you can cast Stasis Field on your own units before a Nuclear strike actually hits, your units will be perfectly preserved
(although the same couldn't be said of your buildings). Also if a battle is faring badly and you have no means of escape, you can use Stasis Field
to protect units until reinforcements can arrive.
One of the best defensive uses of Stasis Field is to use it on High Templar or Dark Archons during their Energy recharge period (usually just after
using a special ability). Since these units do not have a physical means of defending themselves, Stasis Field is an excellent way of keeping them
well protected while their Energy recharges within the Stasis Field. By the time the field wears off, the unit should have enough Energy to cast/use
their Special abilities once again. Be sure not to get other units stuck within the field when you use this particular tactic.
Another good use for Stasis Field is when you need to defend against cloaked units and have no means of detection nearby. It works like Plague or Ensnare
in that you will have to guess where the enemy is (if you're really good, you should be able to see the slight visual distortion around a cloaked
unit) and cast Stasis Field at that area. Since it is an area effect spell, even a half-way good guess at their location will probably capture a few
units. However, this will only work against topside units; it will not work on Burrowed Zerg units, even if your Stasis Field cast is right on top
of them.
Online Privacy Policy
Battle.net Terms of Use Agreement
©2019 Blizzard Entertainment. All rights reserved.
|