|
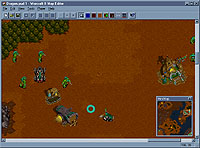 The editor included with Warcraft II allows Windows 95/98/NT and Macintosh users to create their own scenarios by editing the map,
units, and even sound effects. Windows 3.x users can run the editor if they have both Win32s and WinG installed on
their system.
The editor included with Warcraft II allows Windows 95/98/NT and Macintosh users to create their own scenarios by editing the map,
units, and even sound effects. Windows 3.x users can run the editor if they have both Win32s and WinG installed on
their system.
Custom scenarios are called PUDs, and can be exchanged from system to system. Detailed help files are available in the map editor.
This section is intended to provide an overview of the features available, as well as some overall tips for
creating PUDs.
When you first open the map editor, it defaults to a Large (128x128) map using the
Forest terrain set. The menus available are as follows:
File
New: This starts you in a new, blank PUD.
Open: This allows you to select a PUD file that you wish to edit.
Save: This saves the PUD that you are currently editing.
Save As: This allows you to save your PUD under a different name or location.
Sound Editor: This opens up the Warcraft II Sound Editor, which is described below. If you run
the map editor off the Warcraft II CD, rather than a hard drive, this option will be grayed out.
Exit/Quit: This leaves the map editor. You will be prompted to save your current PUD file if
you have made any changes to it.
Edit
Delete: This deletes any items that are currently selected.
View
Toolbar: This toggles the Toolbar off and on. The Toolbar contains shortcut icons for the
most commonly used commands.
Status Bar: This toggles the status bar at the bottom of the screen on and off.
Animate: This option is only available if your display is set to 256 colors. It animates the water
and other terrain features on the map to show you how they will look.
Mini Map: This displays or hides the mini map.
Tools
Select: This switches the cursor to select mode, which allows you to get information on and
edit items that are already placed on the map.
Map Brush: This allows you to change the brush size, and the type of terrain that it will "paint"
on the map.
Human/Orc Start Location and Units: Select the unit type that you want to place on the map.
A Start location needs to be set for each player that can be human controlled.
Gold Mine/Oil Patch/Critter/Circle of Power/Dark
Portal/Runestone: These are all map features that are not directly
controlled by any player. Note that the Circle of Power and the Dark Portal
do not affect the Scenario Objective of a custom scenario. To
change the amount of Gold or Oil in a mine or Oil patch, right click on
the mine/Oil patch and enter a resource amount in the dialog box that appears.
NPCs: This allows you to place any of the Legendary Heroes from Warcraft II (but not the Expansion). Generally, you
want to make them a rescuable unit of a different color to differentiate them during a game.
Player
Player 1-8: This is for switching between the different player's units that you are placing. If
you have a unit selected when you switch to another player, that unit will change ownership.
Map Properties: This brings up a dialog box that allows you to change the map terrain type and
add a brief description.
Player Properties: The Player
Properties screen allows you to set the race,
default controller (human or computer) and A.I. scheme used for each player. The A.I.
scheme does not affect human-controlled units. The different schemes that are available are:
- Land Attack: The computer will
concentrate on building up a sizeable army of
ground troops. While it will not build any transports or other ships, it will use any that it starts with.
- Air Attack: The computer will build a minimal ground defense, and concentrate on air units and
air defences, such as guard Towers and archers/axe throwers. This scheme requires a lot of resources
to be effective.
- Sea Attack: The computer will focus on building up a large and varied navy, with only a
minimal number of ground troops for defending its town. This scheme also requires a large amount of
resources to be effective.
Starting Conditions: This allows you to change the starting resources for each player. You
should generally start each player out with enough Gold and Lumber to build a town hall.
Unit Properties: Using the Unit Properties screen,
you can change the combat variables for each of the
units in the game. Any changes affect all players. Note
that if you change the default values, you should
uncheck the "Use Default Data" box. The adjustable
ratings are:
- Visible Range: This is how far the unit can see.
- Hit Points: This is how much damage the unit
can take before dying.
- Magic Points: This toggle is not currently enabled.
- Build Time: This is how long it takes to build this particular unit.
- Gold Cost: The amount of Gold required to build this unit.
- Lumber Cost: The amount of Lumber required to build this unit.
- Oil Cost: The amount of Oil required to build this unit. In land based scenarios, you can set a
unit's Oil cost higher to restrict the number that can be built.
- Attack Range: This is the distance that the unit can reach with its attacks. Note that a unit
that normally can only attack in hand-to-hand combat can be given a higher range. This effectively
gives that unit an "invisible" attack.
- Armor: This is how much damage the unit's armor absorbs with each attack.
- Basic Damage: This is the maximum amount of damage that the unit deals with each attack.
- Piercing Damage: This is how much damage the unit always does with each attack, regardless
of the opponent's armor.
For more detailed information on the combat statistics, take a look at The Combat Equation.
Upgrade Properties: This allows you to change the cost of upgrading each side.
Help
The map editor has extensive help files which provide more detail on each of the individual
unit properties and settings.
Tips & Techniques
- Place the Start Location for each player right next to their initial units-the X (or O) indicates the center of that player's starting view.
- Each player should start out with a town hall or have enough resources to build one.
- Make sure that each side has enough resources to fight effectively. Computer opponents that are set for Sea Attack or Air Attack need a lot of Gold and Lumber to fight effectively.
- Keep plenty of space between pre placed buildings, to give the computer room to expand.
- Make sure that all computer controlled players have clear paths to resources and other players to keep troops from "hanging up" on obstacles. Avoid using mazes in scenarios that will have computer players.
- A human player can be given computer controlled allies by placing "Active Rescue" units
on the map. The units that start on the map can be rescued by any human player, but once
new structures are built by the rescuable player, they are completely under the control of the computer.
- A player can be "handicapped" by changing the distance to Gold mines, starting resources,
or initial units. Having one extra Peon at the beginning of the game can make a significant difference.
- For a challenge, try fighting against one of each of the different computer A.I. schemes on the same map.
- Several small mines on a map are usually more fun that a few large ones. Expanding and protecting one's resources are a key element of Warcraft II.
- For maps with computer opponents, use the Cheat Codes to watch the computer build up during a game, and make any changes to the map that seem necessary. Look for areas that the computer gets stuck in, see which section of the forest gets chopped down first, etc.
- Mix up computer forces. Since Air and Sea Attack opponents don't upgrade ground troops very often, give each of them a group of units controlled by a Ground Attack AI.
Online Privacy Policy
Battle.net Terms of Use Agreement
©2019 Blizzard Entertainment. All rights reserved.
| |