The Creep
Zerg structures are effectively giant organs, making a Zerg colony a living creature. To provide the required
nourishment and infrastructure, the Zerg produce a living carpet of bio-matter that invading forces have dubbed
the Creep. Creep, produced by both Hatcheries and the aptly named Creep Colonies, will spread rather quickly
across any fertile ground. The Hatchery is the only structure that can be built without the benefit of existing
Creep since it has been genetically designed to automatcially produce enough to fuel its own growth. The
Creep itself is extremely durable and capable of near-instananeous regeneration, only retreating from
infested ground when a Hatchery or Colony is destroyed.
During the early game, the Hatchery produces enough Creep to build the early tech tree structures. However as
a battle progresses you'll want to build Creep Colonies to extend the Creep for colony growth as well as to
lay down the defensive foundation for the colony, converting them to Sunken or Spore Colonies as resources
allow.
One of the quirks of the Creep is that it will provide the nourishment for any Zerg structure built on it whether
they are friendly or not. This presents several very interesting possibilities with early and late game strategies.
Early in the game, scout quickly, find the enemy base, and build your own Creep Colonies on the outer edges of their
Creep and convert to Sunken Colonies as quickly as possible. In some cases, this will catch another Zerg brood by
surprise and can devastate their colony before they know it. Note that this is only a viable strategy on smaller
maps, since traveling the long distances to an enemy base on large maps will give the enemy enough time to build ample
defenses whether they suspect this strategy coming or not.
In the later game, use flying units or Parasites to gain sight of enemy Creep. Then build a Nydus Canal and place the
exit node on the enemy Creep. Note that if the node is built within enemy Sunken Colony attack range, the node will
be attacked, so be careful with the exit node placement. If the node goes unnoticed by the enemy, once it finishes
building you'll be able to flood the enemy town with all your ground troops from within their own base.
Health Regeneration
Perhaps the greatest advantage of the Zerg and their biological nature is an amazing healing and regenerative
ability. A Zerg colony will remain viable unless every creature and structure is completely destroyed, as
even a Zerg on the verge of death will eventually return to full health.
The Zerg ability to regenerate health makes the option to retreat from battle an extremely viable one. Should
your units get damaged in a battle, retreat and use a new force to press the attack while the injured force uses
time to their advantage as they heal. By cycling between two major forces and healing between attacks, you'll
save time and money as newly produced units can be used to bolster your forces rather than replace them. To further
protect the injured units during their healing phase, Burrow them to keep them out of the enemy's sight and prevent
further damage.
Attack/Defense Upgrades
With the sheer number of units the Zerg can produce, getting upgrades can make a noticeable difference in the
battlefield. Unless both you and your opponent go for a heavy air battle strategy, you will usually want to
get the upgrades for the ground based units first. To help speed the upgrade process, build 2 or more Evolution
Chambers early to upgrade both the attacks and carapace as quickly as possible. Fully upgraded Zerglings and
Hydralisks can really turn the tide in a battle, especially since in most cases, they will outnumber the
enemy 2 to 1 with their cheap cost and quick production.
Burrowing
Once this ability is evolved at a Hatchery/Lair/Hive, every Zerg ground unit (with the exception of the Ultralisk)
will be able to Burrow. Burrowing can provide several advantages for the Zerg both offensively and defensively
and the ability should not be underestimated.
First of all, as mentioned before, Burrowing can help preserve units that need to regenerate their health. If possible,
Burrow these units at your main base so that should the base need immediate protection, these units can provide the
last line of defense, even in their injured condition and perhaps give you the advantage of surprise as they Unburrow.
Another key use for Burrowing is for reconnaisance. By using Burrowed Zerglings, you can keep an eye on every resource
node on the map as well as any key choke points at a minimal cost. The placement of these Burrowed Zerglings can also
be a strategy in itself. Burrow Zerglings at the optimal build area (nearest to both the minerals and gas) to prevent
your enemy from building there and either forcing them to build further away or moving to another expansion area. If
you wish to watch enemy expansion a little more passively and wait to pounce on them, Burrow your Zerglings right behind
or next to a Mineral cluster. Even if they can detect the Burrowed Zergling, this will help make it more difficult for
the enemy to spot your scout.
Burrowing can also be highly useful in expansion attempts. In the early to mid game, send out and Burrow Drones at
key expansion areas and keep them there in hiding until you are ready to expand. Should your main base be invaded
and lost, these Drones will also provide you the chance to quickly rebuild without having to worry about getting
a Drone past the invading forces. This comes in handy particularly in Team or Allied games where you have a better
chance at rebuilding while your teammate or ally occupies the enemy.
|
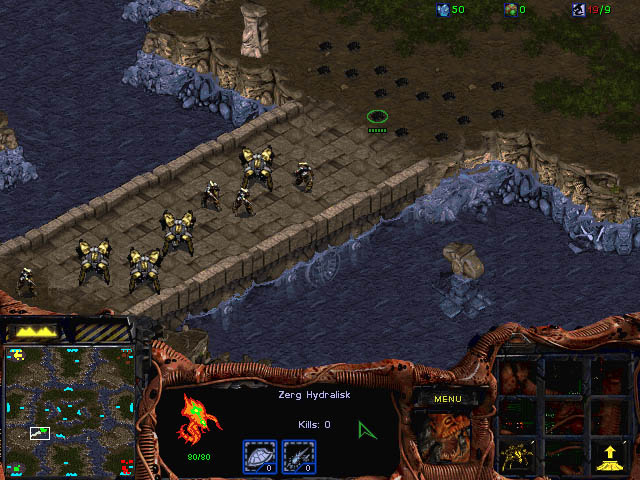
Finally, use Burrow to set up ambushes. The element of surprise can greatly affect the outcome of a battle and you should
use it to your advantage whenever possible. Choke points are excellent locations for ambushing (See the side image) and
even if the enemy outnumbers you, these positions can give you the advantage. By placing your units at a choke point exit,
they'll be able to overwhelm enemy units trying to cross in a line no more than 2 or 3 units wide. Using this method, your
force should be able to take an enemy army twice their size with a minimum of effort.
|
|
|
[ Click to Enlarge - 90 KB ]
|
The key in this type of ambush is to Unburrow just before the enemy can make it out of the choke point. This will
maximize the element of surprise and ensure that you can kill a few of the enemy before they can retreat. Also if possible,
keep a row of Melee Attackers (i.e. Zerglings) in the front line closely backed by ranged attack units (i.e. Hydralisks) to
make the ambush as destructive as it can be.