|
To defeat another Zerg brood, you must know the full extent of the strengths and weaknesses of
each unit and structure. Since you and your enemy both have the same units and strategies at
your disposal, expect a fiercely fought combat. Production speed is extremely important, as is
the manner you decide to develop your Brood structures.
Overlord Scouting
Early reconnaissance with the first Overlord is a risky tactic, but the tactic can really pay off.
If you can find your opponent early and see what they are building, you'll be able to adjust your
own building order to properly counter or exploit the enemy's starting tactic. This provides you
with an important, tangible advantage over your enemy who does not have this information. Once
over your enemy's base, your Overlord will not have much to fear until your foe begins producing
Hydralisks or building Spore Colonies. At this point your Overlord should retreat to a safe distance
as soon as possible to avoid being destroyed.
The drawback of early Overlord scouting is the possible revealing of your position to the enemy.
This gives them the opportunity to plan an offensive or defensive strategy of their own based on
your location and what you could do from those starting spots. Two starting locations very close
to each other usually results in a brutal Zergling rush fest. Starting spots that are a little further
away usually results in Sunken Colonies being built, then both players traveling up the tech tree.
Early Game Disruption
One of the quirks in a Zerg vs. Zerg encounter is that every player can build on each other's
Creep, even the enemy's. If you can quickly find the enemy with an Overlord or Drone scout,
you can send your own Drones over to your opponent's Creep and begin building Creep Colonies.
With this tactic you'll need a quick Spawning Pool to convert those Creep Colonies into Sunken
Colonies. If done quickly enough, you should be able to severly hamper an opponent's early game
build and strategies.
Burrowing
The ability to burrow can be very effective all throughout a game. You can use it to save your Drones
when your resource areas are attacked. Once your defending units have secured the area, the Drones
can unburrow and continue their work. You can also use it to quickly burrow Zerglings around the
map to keep an eye on key expansion locations.
Burrowing can also be useful for ambushing enemy forces, hiding extra Drones at potential expansion
spots, and protecting valuable ground units such as the Defiler. Watch for enemy Overlords that may
be searching for burrowed units. Should a burrowed force be attacked while underground, they face a
slight disadvantage. Unburrowing takes a small amount of time, and during this time your units are
vulnerable to attack.
Zerglings
Zerglings are the first available attack unit for the Zerg. With their extremely low cost and ability
to spawn in pairs Zerglings can terrorize enemy colonies very early in a game. Their power comes
from their sheer numbers, and when upgraded with Adrenal Glands (faster attack rate) and Metabolic
Boost (faster movement) Zerglings are truly an awesome combat force. If built in very large numbers
(100+), Zerglings can be used to completely flood an enemy base and tear everything down in a very
short period of time. Even Hydralisks, Mutalisks, Guardians or Ultralisks have a difficult time dealing
with such an immense number of Zerglings.
To counter a "flood" tactic of that magnitude, use Lurkers as your primary counter unit. Their
Subterranean Spines can rip through entire waves of Zerglings before the Zerglings can get close
enough to cause major damage. If Lurkers are not available, you'll need masses of your own Zerglings
supported by Sunken Colonies, Hydralisks, or Mutalisks to fend off that type of attack. Use choke
points to your advantage when stopping floods of Zerglings, as using favorable terrain may sometimes
be the only way to stop a massive Zergling rush. On open ground where the Zerglings can surround
and outnumber ground units five or even ten times to one, Adrenalized Zerglings will definitely have
an advantage.
In most land based maps, you will want to continue Zergling production throughout the game, not
just at the beginning. Combining Zerglings with Dark Swarm is another extremely useful tactic and
if your opponent is using Hydralisks or other ranged attack units to make up the core of their forces,
Zerglings covered by Dark Swarm will make quick work of them or remain protected while razing an
enemy base.

|
|
|
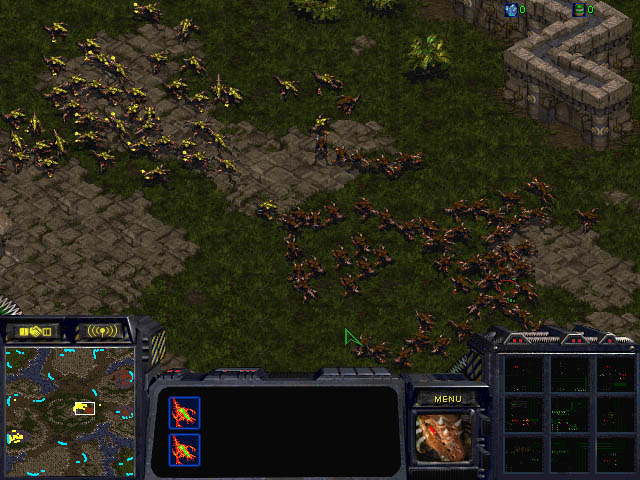
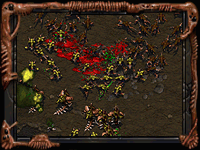
[ Click to Enlarge - 86 KB ]
Zergling vs. Zergling encounters are fairly easy to manage - the player with the most
Zerglings and/or upgrades will almost always win.
|
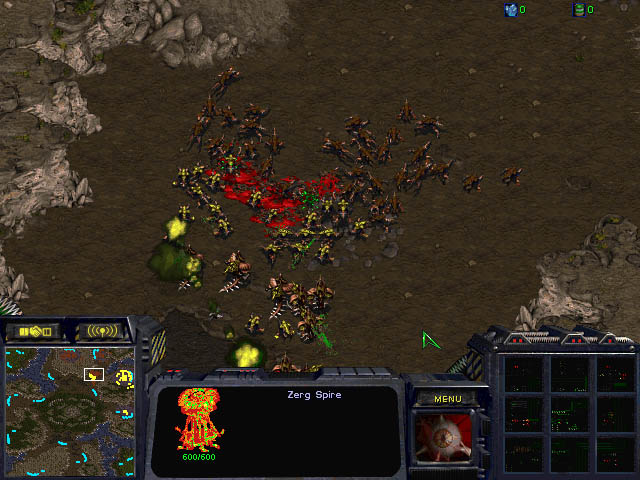
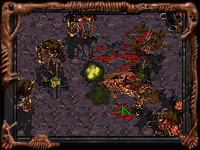
[ Click to Enlarge - 79 KB ]
To counter Zerglings, use your own Zerglings (making sure they have more upgrades), Mutalisks or Hydralisks.
A mix of Hydralisks and Zerglings can generally overcome an enemy who is using only Zerglings.
|
Hydralisks
As the most versatile ground unit for the Zerg, the Hydralisk appears in almost every Zerg battle.
Understand all the strengths and weaknesses of the Hydralisk so that you can exploit them to
your advantage. For more details, check the Hydralisk
section.
Probably even more so than with Zerglings, having the clear advantage in Hydralisk numbers will
determine the outcome of a Zerg vs. Zerg battle. In addition to just relying on sheer numbers, a
wily Zerg Brood will use their Hydralisks creatively to gain victory. Set up choke point ambushes
with Burrowing, use them to drop on the enemy from behind, or maybe use them as a decoy force
so that units like Mutalisks or Guardians can accomplish a task elsewhere. Use the versatility and
usefulness of the Hydralisk to the full extent and they can save you in any Zerg vs. Zerg encounter.
Stopping Hydralisks can be a little tricky, particularly in ground battles. Use Plague, Ensnare, and
Zerglings with Dark Swarm cover as often as possible against masses of Hydralisks. If you have
Mutalisks or Guardians available, use the terrain to your advantage and attack from over ridges,
water, or space to dwindle their numbers without taking massive return fire.
Lurkers
Lurkers are excellent tools against the other Zerg ground units. They can tear Zerglings and
Hydralisks to shreds and even the mighty Ultralisk has something to fear from the Lurker. Use
them for colony defense and ambushing invading forces at choke points or high ground ramps.
The one drawback when using them against other Zerg is that any Zerg opponent will typically
have an abundance of Overlords to detect a burrowed Lurker. Once detected, the Lurker is vulnerable
to air attack from Mutalisks and Guardians as well as the Spawn Broodling ability of the Queen.
Mutalisks
Much like the Hydralisk, the Mutalisk is also an extremely versatile Zerg unit, only the air is the
Mutalisks' domain. Mutalisks are not hatched cheaply, but their ability to fly and attack both
ground and air proves most useful in a battle between Zerg broods. Keep several pairs of Scourge
with your Mutalisk groups at all times on the chance that they run into an enemy Mutalisk group.
The Scourge will help tilt the tide of battle in your favor.
Should your opponent build masses of Zerglings, Hydralisks, and defensive Sunken Colonies,
your best bet will be to build Mutalisks. First take care of any Hydralisks and Spore Colonies
present then finish off the rest with relative ease. If the Hydralisks outnumber your Mutalisks,
use your enemy's structures for your own benefit. Maneuver your Mutalisks in circles and pick
off Hydralisks one by one as they try to make their way through their own base. If you have the
advantage in numbers, just get it over with and attack the entire force head on and continue with
the razing at your leisure.
Mutalisks tend to tightly stack when attacking a target and are particularly vulnerable to area affect
attacks or abilities. Ensnare, Plague and Devourer Acid Spores can all quickly affect your entire
Mutalisk horde. Dark Swarm covered Hydralisks can also be deadly to Mutalisks over open ground.
While Spore Colonies can deal significant damage to Mutalisks, the Colonies must be built in large
clusters to effectively repel a large Mutalisk group. If the Spore Colonies are spread apart and not all
in range of each other, large Mutalisk forces can pick them off one by one from the outer perimeter
to the colony core.
|
|
|
[ Click to Enlarge - 87 KB ]
Mutalisks are the perfect counter to Zerglings.
|
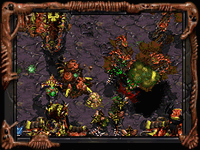
[ Click to Enlarge - 101 KB ]
Hydralisks and Spore Colonies fight fiercely to prevent Mutalisks from overcoming them.
|
Scourge
Scourge can be the key in a heavy air based battle. They can quickly destroy an invading
Guardian force and any Devourers that may follow as escorts. Scourge make the perfect
Overlord killers. Depending on how closely your opponent keeps his population count to
the population limit, Overlord hunting with Scourge can quickly cripple an enemy's unit
production. Scourge do not work as well against large groups of Mutalisks, especially if
the Mutalisks are well managed. If an enemy Mutalisk force is distracted by your own
Hydralisks, Mutalisks or Devourers, then the Scourge may come in handy to destroy
Mutalisks one by one.
If you opponent uses Scourge heavily, the best counter is Scourge hunting with a few of
your own Mutalisks or Overlords. Use the Scourge's quick tendency to auto-acquire enemy
targets to lure them into traps or suicide traps. If more than two Scourge impact and destroy
an Overlord, your enemy has wasted a large number of Scourge. Quick moving Mutalisks
can also lure Scourge over your own Hydralisks and Spore Colonies. Since Scourge require
extensive Vespene gas to produce, causing your foe to lose Scourge in such a fashion can
be quite painful to your enemy's economy.
Overlord Hunting
The Overlord serves many different fucntions for the Zerg and should be protected whenever
possible. Unless you have a definite need for early scouting, try not to send Overlords out by
themselves. This makes them particularly vulnerable to Overlord hunts and every time you lose
one, you lose eight control units, a potential transport, and a detector. Keep them within the safety
of Spore and Sunken Colonies or with an attack force adequate enough to protect them. One
thing NOT to do with Overlords is try and hide them in a corner of the map, hoping the enemy
will not notice. Most experienced players will find them and left unprotected, you can lose an
entire group of Overlords in a matter of seconds depending on the attacking units.
On the flip side, if your opponent disregards the advice above, take every opportunity to hunt
down any stray Overlords your enemy might have around the map. A pair of Scourge can
destroy an Overlord before your enemy realizes what's happened. Packs of Mutalisks can
quickly travel around the map and eliminate any unprotected Overlord presence with ease.
|
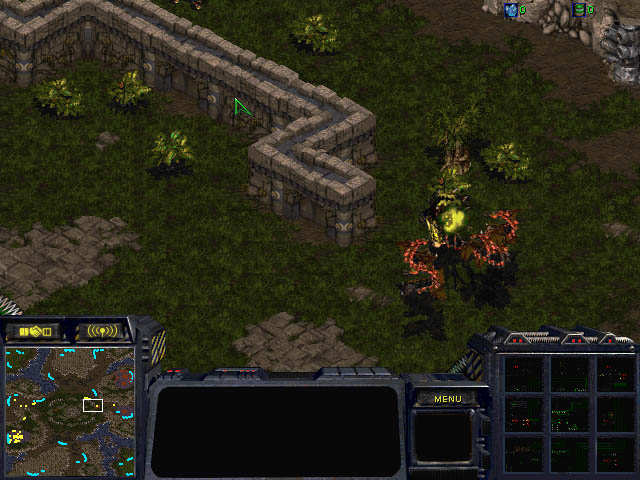
|
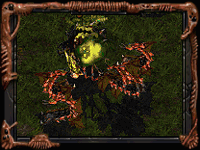
[ Click to Enlarge - 75 KB ]
Mutalisks go Overlord Hunting.
|
Queens
The Queen's abilities are quite useful against other Zerg broods and should be used at
every opportunity. Since most Zerg units travel in tight packs, they can be ensnared en
masse, making the units ripe for attack. Enemy Ultralisks or Hydralisks can be easily
dealt with using Spawn Broodling. Parasite is extremely helpful when trying to keep an
eye on enemy movement and unit production. Use Parasites on Overlords to gain their
detection abilities, especially on Overlords in enemy bases protected by Lurkers. Parasites
can also keep an eye on any transporting activity of the affected Overlord. With a few fully
charged Queens, you should be able to Parasite the majority of an enemy's Overlord
population.
To deal with enemy Queens, the best solution the use of pairs of Scourge to pick the
Queens off one by one. Mutalisks also work well as Queen hunters, but they run a
higher risk of being hit by an Ensnare or being parasited.
Guardians
Guardians are a typical unit used when breaking into a well defended Zerg colony.
With their long ranged attacks, Guardians have little to fear from defending Spore
Colonies or enemy ground troops. They do, however, need to worry about any Mutalisks,
Scourge or Devourers that may be nearby. For that contingency, always keep your
Guardians escorted by Mutalisks, Scourge or Devourers of your own.
Devourers
Devourers are an excellent answer to enemy Mutalisks. Their splashing Acid Spores
can seriously cripple a group of Mutalisks, making them vulnerable to attack from your
own Mutalisks and Scourge. Devourers also work very well against Guardians, slowing
down their attacks before the Devourers can finish them off.
If you need to deal with enemy Devourers, Scourge again prove to be the best answer.
If you can catch the Devourers over open ground, you can also use Hydralisk groups to
destroy them. If using Hydralisks, position your horde beneath the Devourers before
opening fire to cause the most damage possible before the Devourers can escape.
Ultralisks
Ultralisks can be quite fearsome, especially in groups. Use them to take down enemy
Sunken/Spore Colony defenses, ravaging packs of Zerglings, or Hydralisks. They are
unaffected by Dark Swarm and Plague is not as devastating to Ultralisks and their 400
hit points.
Enemy Ultralisks can be easily dealt with using a Queen's Spawn Broodling ability.
If Queens aren't available, use Mutalisks and Guardians to destroy Ultralisks from the air.
Nydus Canals
In the late game, Nydus Canals become a key threat for both sides. Their ability to quickly
transport units from one location to another can nullify the mobility advantage a Mutalisk force
possesses.
One of the strange properties of the Nydus Canal is its ability to be built on anyone's Creep,
friendly or not. In the case of the Nydus Canal, all you need to build the exit node is to see the
enemy Creep. Using this tactic, you can invade their base from within using all the ground forces
you have available. This can be especially useful on "island" maps where transporting large
numbers of units can be tricky or impossible if your foe has a superior air force.
Online Privacy Policy
Battle.net Terms of Use Agreement
©2019 Blizzard Entertainment. All rights reserved.
|