The first thing you should know about water maps is that you have to treat
them as a land level with more units. New water players that may be very skilled at stopping rushes
on land maps sometimes do not apply those same skills to water maps. The same danger of early attacks by Grunts
is also worry on water maps. Plan to defend against invasions or stop them before they happen.
Shipyards
Often, you want to build your Shipyard as close to an Oil spot as possible.
On some positions the Oil Spot is very close to the shore in which case you want to place your
Shipyard a few spots back so the Oil Tankers don't bunch up and stop.
You should know all the Oil spots on the map. A good way to tell if you are near an Oil spot or not when trying to
build your Shipyard is to see if your yard turns red. If it turns red,
you are too near the Oil. Move the Shipyard away from that red location to
the first spot where your yard turns green and build it. Make sure it's not red because it's
on land, or because you have not explored that area yet.
When building multiple Shipyards, try to build both Shipyards right next
to each other. Although the main purpose of more than one Shipyard is to build ships much
faster, another reason to build more than one is so that you can quickly group your completed ships.
If the Shipyards are under attack by one enemy Juggernaught, with two Shipyards you
can build 2 Battleships at the same time. Once they are completed they will be able to defeat the
attacking Juggernaught with the number advantage. If you separate your Shipyards you will have to group units
after they are created so that they can fight together. If you get into a big Battleship fight you want all of
your ships together as quickly as possible which doesn't often happen when the Shipyards are separated. 2 Juggernaughts
for example can attack one of the Shipyards while you're forced to bring in reinforcements from the further
away Shipyard one at a time or wait for more than one.
Try to build your Shipyards next to Oil Spots that are not regularly checked positions. Quite often for each position
there is an Oil spot that the majority of people use, and one Oil spot that people rarely use. Pick the rarely one as
it will be least likely to be found. This won't work against everyone but it will work more than you think.
Repair-build The Shipyard
It's important not to lose your Oil spot to an enemy. If you repair the Shipyard as it's being built you can reduce time needed
to secure your Oil Spot.
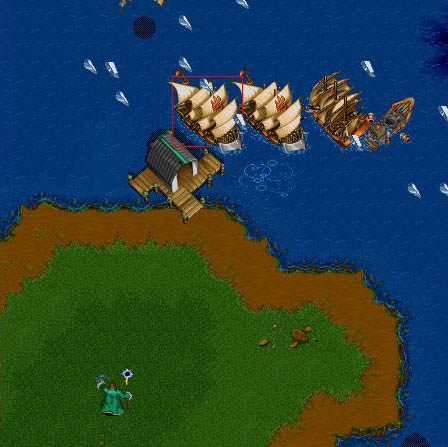
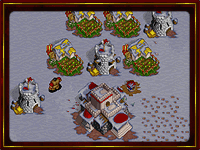
|
|
[ Click to Enlarge - 45 KB ]
4 Peons work on building a Shipyard. 1 Peon builds while 3 repair.
|
If You Miss the Oil Spot
If you accidently build your Shipyard too far away from Oil, build another Shipyard next to Oil rather than an Oil Refinery.
The Shipyard only costs 100 more Lumber than an Oil Refinery and can be used to build more ships at the same time.
Oil Rigs
You can tell if an Oil spot has a rig on it or not by taking an Oil
Tanker, selecting build platform and running your Oil rig icon over
various Oil spots on the little map.
Owning the Seas Often Means a Win
If you dominate the seas you can almost guarantee a win depending on the map. If you control the sea you can
prevent the enemy from expanding and eventually cause them to run out of resources.
There are some keys to owning the sea. Attack early with Battleships and remove the enemy from the Sea. Use Destroyers to
stop any Transports and watch for any further Shipyards. Guard the Oil Spot with Battleships or Submarines. Expand to other
Gold Mines and invade over and over again until the enemy is destroyed. However, if the enemy is allowed to use Transports to get around
then controlling the sea will not stop them.
You Don't Always Need to Win the Sea to Win the Game
If you can Transport around the map that is all you need to expand and attack the enemy.
Seek out and destroy any Transports. If you can't stop the Transports then controlling the sea is not going to help you.
You Can Repair Transports
Move the Transport onto the shore. Select a Peon and hit R for repair then click on the Transport. Repair Transports
when they are damage to allow them to last longer.
Attack the Foundry Before Shipyard
The Foundry has 350 less hit points than the Shipyard. When you destroy the Foundry you prevent the enemy from
building Transports and Battleships in all of their Shipyards. You have much greater chance of quickly destroying the
Foundry then going for the Shipyard.
If the Foundry has just been completed then chances are,
if the player is any good, the next ship that pops out will be a
Battleship. If you only have one Juggernaught and it is your first one then
you want to stay on the side of the Foundry that is furthest from the
Shipyard. That way when that Battleship pops out, it won't be able to
hit your Juggernaught until it chases it. Then when you see that
Battleship then run until you have another Juggernaught.
Don't Build the Foundry Next to the Shipyard
Instead, try to hide it elsewhere. That way when the enemy comes, they will think you
do not have a Foundry or won't know exactly where to find it. If you can, put it on the opposite side of your
island. Sometimes people will attack your Shipyard if they don't see your Foundry. It's better for them to attack your
Shipyards because they have more hit points and you probably have more than one.
If they attack the Shipyard, it will give you time to build a Battleship. If they attack your Foundry first, you will have a
whole lot less time to make that Battleship.
Don't let yourself be hit by Submarines
Get Flying Machines as soon as possible on water maps to protect against Submarines.
If Defenseless Against Submarines, Retreat and Hide
If someone beats you to Gnomish Inventor and attacks your
Juggernaughts with Submarines run! Hide any ships you have. If the Submarine attacks
your Shipyard then get a bunch of Peons repairing it. They will not get
attacked because Submarines can't shoot land targets. If you do see any enemy
Battleships run! Don't let Battleships take out your Peasants.
Upgrade to Stronghold or Keep as soon as possible then quickly build the Gnomish Inventor with multiple Peons repair-building it.
Quickly train a Goblin Zeppelin and move it to where the Submarines are to spot them.
Ship Upgrades
You don't really start seeing the power of being a level or two above other ships until you have more than one ship in a
battle against ships a level or two below you. If you have a level 2 ship and your enemy has a level 1 then you won't have
that much of an advantage.
The more Battleships you have, the more you will see the upgrades pay off.
You don't have to upgrade your Ships to level 5 every game. The final Cannon upgrade is very expensive
2000  200
200  3000
3000 and should be upgraded only in certain situations. For those resources you can have
2 more Battleships. The upgrade can be beneficial in long drawn out Battleship to Battleship battles when resources
are not a problem. This upgrade also can help when destroying Gold Mines on Spiral.
and should be upgraded only in certain situations. For those resources you can have
2 more Battleships. The upgrade can be beneficial in long drawn out Battleship to Battleship battles when resources
are not a problem. This upgrade also can help when destroying Gold Mines on Spiral.
What Do I Do If My Shipyard is Destroyed?
If your Shipyard has been destroyed, you can try to rebuild it elsewhere on another side of your island. You will find however
that skilled water players will be expecting this and will destroy it as it is being built. In that case you will have to move
on to other options.
If you have a Transport left when your Shipyard gets destroyed, send a Peasant off and build Shipyards on another island. Try to
hide the Shipyards and make sure they are near some Oil. Before you let the enemy know you are back in action on the sea,
build a huge naval force.
If you don't have a Transport, make a choice: get a bunch of Catapults
and try to either save your Shipyard or build a new Shipyard on your island somewhere else, or wait
until you can cast Blizzard on enemy ships to allow you rebuild the Shipyard. For most players, the last choice is the best.
Choice 1, The Catapult Route (Not Recommended)
If you have difficulty fighting Battleships with Catapults advance to the second choice.
If not, start making Catapults. Don't bother to upgrade the Catapults, because the resources you save on upgrading will
allow you to build even more Catapults.
When you start to get attacked use the hit and run Catapult strategy. If you are
able to keep the Battleships away from your shore, often the enemy will give up attacking you and will not watch
the Oil Spot as closely possibly allowing you to mine Oil from it.
Do not neglect the land forces. Don't build all Catapults as the enemy often invades after seeing
the Catapults in the hopes that they will be poorly defended.
Catapults are expensive so you must be ready to protect them. Keep using Catapults until you can research Blizzard or Death and
Decay.
Choice 2, The Blizzard and Death & Decay Route (recommended)
Quickly head up the tech tree to Fortress/Castle and build Mages or Death Knights. Once you get them and Blizzard/Death and Decay
THEN rebuild your Shipyard. Cast Blizzard on anything that attacks the Shipyard. Only advanced players will be able to
defend against this by moving out of Blizzard range then doing hit and run attacks on the Shipyard and Oil Rig.
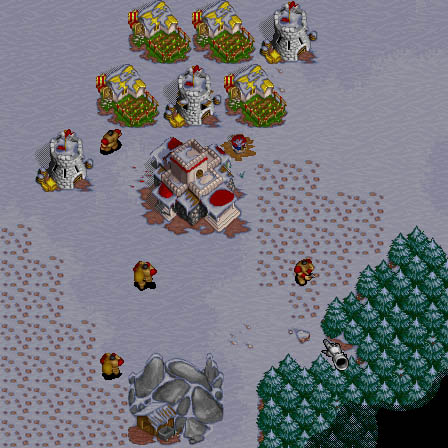
|
|
[ Click to Enlarge - 47 KB ]
A Mage clears the port of enemy Battleships.
|
Defenses
The same concepts from land defense can be applied to water maps. Use Wall-in techniques and
defend the town with walled-in Towers or a Nate Formation.
One of the biggest dangers is an early land invasion. Towers can stop most attacks when you can't stop the landings with Battleships
or Destroyers. Often by being very offensive with Battleships, Destroyers and Flying Machines you
can prevent most invasions before they happen.
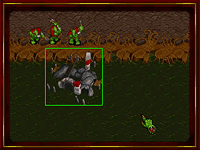
|
|
[ Click to Enlarge - 63 KB ]
A walled-in Cannon Tower and two Guard Towers provide defense.
|
Once the enemy gets Death and Decay or Blizzard do not get near their
shores unless you are sure all the Death Knights or Mages are dead or you are sending in a Transport to invade.
Ultimate Sea Defense
Orcs sometimes run into problems on water maps when dealing with Mages, Invisible Mages, and Invisible
Transports. There is one nice formation you can set up that can easily defeat all of these as seen in
the below pictures. For this set up you need one direction facing the enemy that is somewhat easy to
wall, it can be large but it should be about 2 screens or less wide.
Build Wall Along Shore a Few Feet Back
Build a wall a bit back from the sea so that it can only be hit by Battleships close to the shore.
The wall has to be complete leaving no holes. Several walls can be placed along the shore so the the enemy cannot
build large buildings such as Barracks, and to make pathing difficult. The walls will also prevent Invisible Mages from
getting into the Town.
Build Towers Behind the Wall
The Towers should be placed behind the wall in such a location that it can reach ANY unit that lands on
the shore but yet still cannot be hit by Battleships. You will probably want Guard Towers as they
are cheaper and will also fire at Dragons and Flying Machines.
Death Knights and Ogre-Mages
Keep the Death Knights back and bring them up close enough to cast Death and Decay
when the enemy lands. You don't want the enemy to be able to Polymorph them from the edge of the
shore so use hit and run Death and Decay. Use Ogre-Mages to cast Runes around the Transport as it lands or
around any units that unload from the Invisible Transport.
Recon
Place Flying Machines around to spot any incoming attacks.
Repair
Have Peasants or Peons on hand to repair any damaged Towers or walls.
Final Instructions
When the enemy lands, begin casting Death and Decay or Blizzard followed by Runes. If the enemy uses Blizzard, try as quickly as
possible to kill the Mage using Death and Decay, Runes or even Catapults. Repair any damage. Make sure the walls are
complete so no Invisible Mages can get in. The following setup was used to hold off the constant attacks of
four highly skilled players and was eventually killed off enough enemy units which made it possible to win the game.
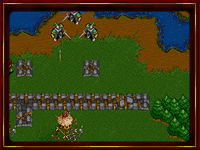
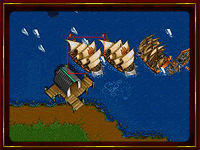
|
|
|
[ Click to Enlarge - 59 KB ]
Death Knights hang back ready to Death and Decay, Ogre-Mages ready to cast Runes.
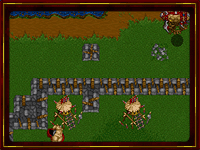
|
[ Click to Enlarge - 58 KB ]
Peons continue to build walls as they are destroyed by Battleships or Blizzards.
|